How to change the ADSK
Applies to: GnuPG VS-Desktop® 3.3.2 and 3.3.3, November 2025
Your organization has replaced the so-called ADSK (Additional Decryption Subkey). This additional key serves as a central archiving key for internal security and retention purposes. To ensure that only the new ADSK is used in the future, update your key once and revoke the old ADSK.
GnuPG evaluates the ADSK registry entry only when you create a new OpenPGP key or add an ADSK to an existing key. The previous ADSK therefore remains active until you revoke it manually. Without this revocation, communication partners will continue to encrypt to the old ADSK.
This guide explains, step by step, how to update your key and add the new ADSK.
Prerequisites
Before you begin, make sure that the following conditions are met:
- The new ADSK has already been configured by your administrator (usually via the Windows Registry).
- Both the old, revoked certificate and the new certificate of the ADSK origin key have been distributed and imported on your computer.
To check whether your key still includes the old ADSK, open Kleopatra and double-click your own certificate to view the Certificate Details.
Preparation
Create a Backup
Before making any changes to your key, you should create a backup copy of your private key. Make sure that the backup is stored in compliance with VS-NfD requirements.
Proceed as follows:
- In Kleopatra, select your own certificate (displayed in bold).
- Right-click it and choose Backup Secret Keys.
- Select the storage location and enter your password.
Tip: Create regular backups of your key—especially before making changes such as updating the ADSK.
Starting Point
In Kleopatra's certificate list, you should see at least your own key (displayed in bold) and the certificate of the new ADSK origin key, which has already been configured on your computer.
Note: If either of these certificates is missing, please contact your organization's administrator.
You will probably also see the certificate of the old, revoked ADSK origin key. The list might look similar to this:
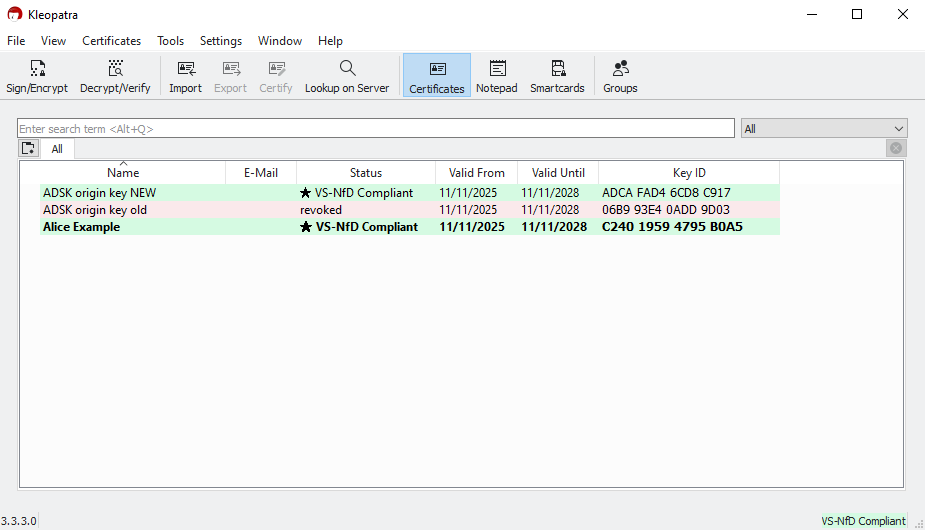
This guide uses the name Alice Example as a placeholder for your own OpenPGP key. Replace it with the name of your own key.
Revoke the old ADSK
GnuPG checks the Registry entry for the ADSK only when you create a new OpenPGP key or add an ADSK to an existing one. The old ADSK therefore remains active until you revoke it manually. Revoking the old ADSK ensures that no data is encrypted for a key that may have been compromised, expired, or replaced as part of your organization's policy.
At the moment, the old ADSK cannot be revoked directly in Kleopatra. You need to use the command line instead.
- Open the Windows search, type cmd, and start the Command Prompt.
- Enter the following command, replacing the name in quotation marks with your own key name as it appears in Kleopatra:
gpg --edit-key "Alice Example"
(Example command, replace Alice Example with the name of your own key.)
The output should look similar to this:
 Secret key is available.

sec  rsa3072/C24019594795B0A5
     created: 2025-11-11  expires: 2028-11-11  usage: SC
     trust: ultimate      validity: ultimate
ssb  rsa3072/A0B3D9BA7A93E06A
     created: 2025-11-11  expires: 2028-11-11  usage: E
sub  rsa3072/E8359B8C17CA908A
     created: 2025-11-11  expires: 2028-11-11  usage: R
[ultimate] (1). Alice Example

gpg>
The output lists your primary key and all associated subkeys. Usually there are three, but there may be more.
Look for the subkey that shows usage: R in its line. The letter R indicates the key used for decryption, and the line begins with sub.
Keep in mind that numbering starts at 0. In this example, the third subkey is selected with the following command:
gpg> key 2

sec  rsa3072/C24019594795B0A5
     created: 2025-11-11  expires: 2028-11-11  usage: SC
     trust: ultimate      validity: ultimate
ssb  rsa3072/A0B3D9BA7A93E06A
     created: 2025-11-11  expires: 2028-11-11  usage: E
sub* rsa3072/E8359B8C17CA908A
     created: 2025-11-11  expires: 2028-11-11  usage: R
[ultimate] (1). Alice Example

gpg>
The asterisk (*) indicates which subkey is currently selected. If you selected the wrong one by mistake, repeat the command with the correct number until the correct entry is marked.
To revoke the selected subkey, enter revkey and confirm the prompt that
follows. If no specific reason has been provided, choose 0 = No reason
specified and press Enter again. Then confirm the revocation once more:
gpg> revkey
Do you really want to revoke this subkey? (y/N) y
Please select the reason for the revocation:
  0 = No reason specified
  1 = Key has been compromised
  2 = Key is superseded
  3 = Key is no longer used
  Q = Cancel
Your decision? 0
Enter an optional description; end it with an empty line:
>
Reason for revocation: No reason specified
(No description given)
Is this okay? (y/N) y

sec  rsa3072/C24019594795B0A5
     created: 2025-11-11  expires: 2028-11-11  usage: SC
     trust: ultimate      validity: ultimate
ssb  rsa3072/A0B3D9BA7A93E06A
     created: 2025-11-11  expires: 2028-11-11  usage: E
The following key was revoked on 2025-11-11 by RSA key C24019594795B0A5 Alice Example
sub  rsa3072/E8359B8C17CA908A
     created: 2025-11-11  revoked: 2025-11-11  usage: R
[ultimate] (1). Alice Example
The output confirms that the selected subkey (ADSK) has been successfully revoked.
Important: Exit the gpg command line with save to make sure the
revocation is saved permanently.
gpg> save
The old ADSK has now been revoked. In the next step, you will add the new ADSK.
Add the new ADSK
Open Kleopatra and double-click your own certificate to view its details. Then switch to the Subkeys tab and click More Options.
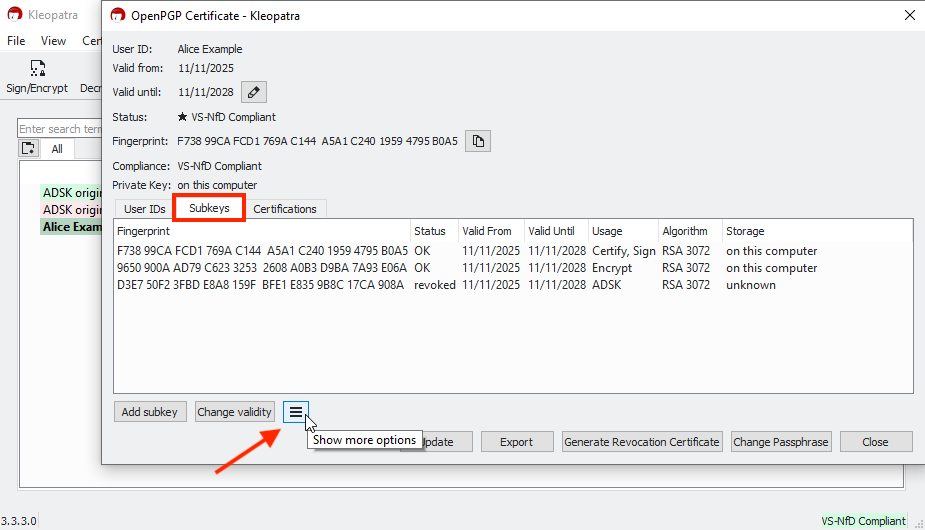
The list should now show Add ADSK as the last option:

If the Add ADSK option does not appear in Kleopatra, the new ADSK may not yet be configured, or Kleopatra has not been restarted since the change. In this case, close Kleopatra completely (do not just close the window), restart the program, and try again. If the option is still missing, contact your administrator.
Select Add ADSK and confirm the command in the dialog window that appears.

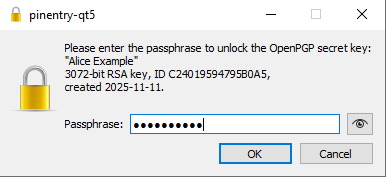
Next, enter the password for your own key to confirm the addition of the ADSK.
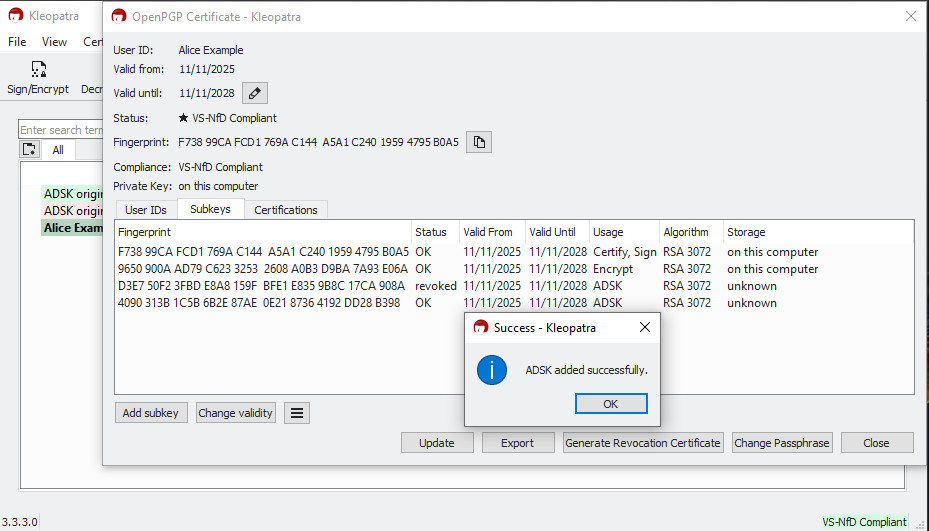
After confirming, Kleopatra displays a success message. In the subkey details, you can now see the newly added ADSK.
Export and Distribute the Certificate
After updating your certificate, export it and distribute it according to your organization's procedures. For example, by publishing it on an internal website, placing it on a network drive, sending it by email or removable media, or distributing it automatically via an internal keyserver (LDAP, LDS) or WKD/WKS.
Note: Exporting and distributing the updated certificate is a prerequisite for ensuring that all communication partners can encrypt with the current ADSK.
During the transition period, some users may not yet have revoked the old ADSK or updated their certificates. This does not cause any errors or issues when sending encrypted emails. However, part of the communication will still be encrypted for the old ADSK instead of the new one until everyone has imported the updated certificates. Make sure the updated certificate is distributed across your organization as quickly as possible.